- Ở bài viết trước mình đã hướng dẫn một cách để có thể truy cập những api bị giới hạn quyền truy cập bằng cách sử dụng jwt. Và ở bài viết này mình sẽ hướng dẫn mọi người truy cập những api đó bằng cách sử dụng Oauth2
- Trước hết chúng ta sẽ khởi tạo dự án và chọn những thư viện như sau:
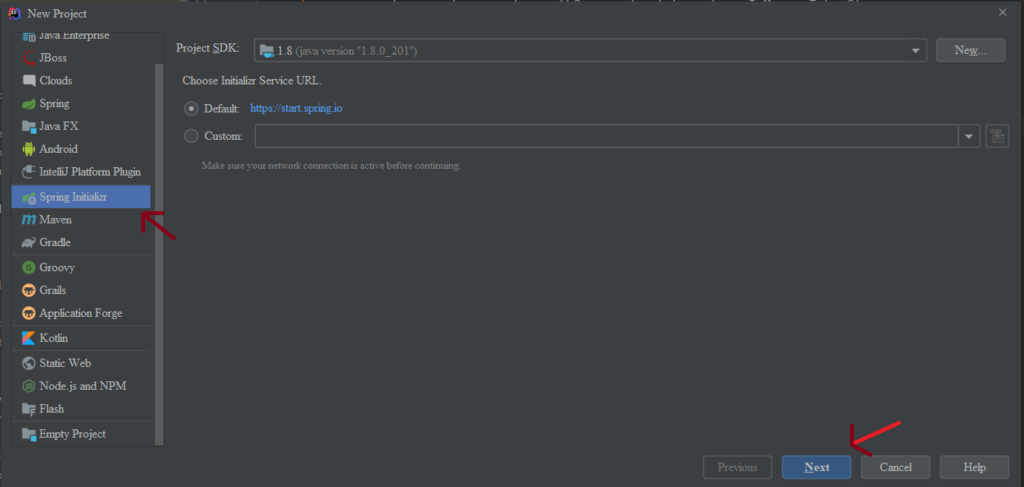
+) Chúng ta tạo dự án mới và chọn Spring Initializr sau đó chọn next
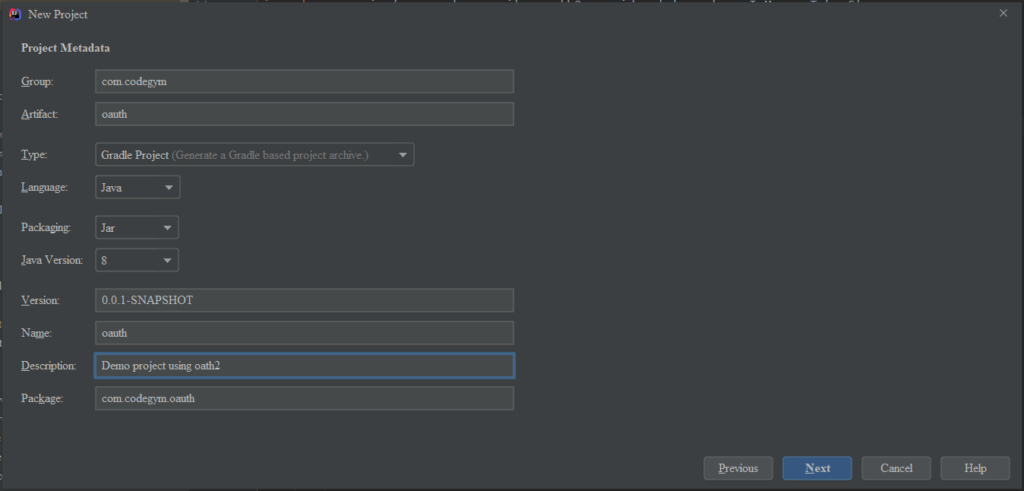
+) Tiếp theo tạ có thể cấu hình như trong ảnh, nếu bạn sử dụng maven thì ở mục type chọn Maven Project, mục group và artifact bạn có thể đặt theo tên mình muốn ở dự án này mình chọn theo kiểu gradle và jdk8:
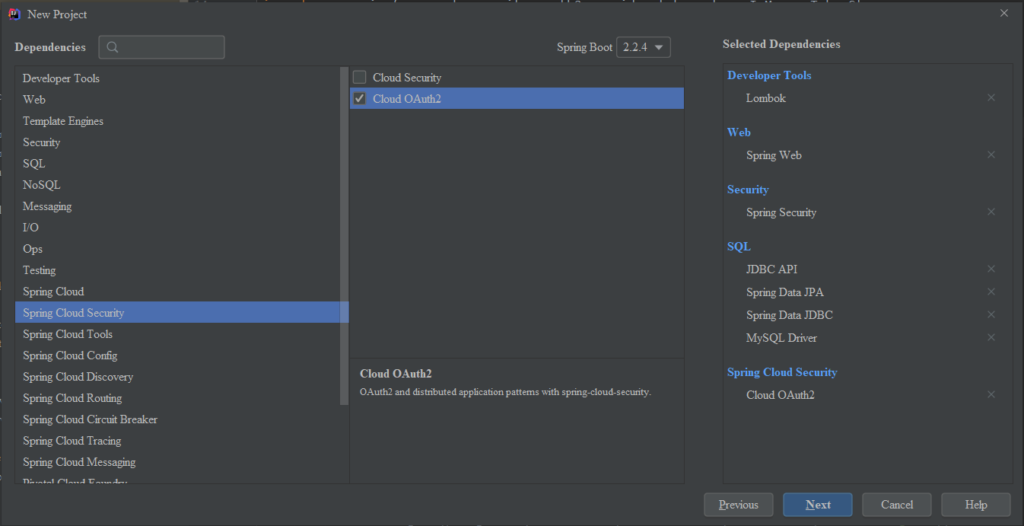
+) Sau đó ta chọn những thư viện cần thiết như trong hình:
- Sau khi làm xong những bước chuẩn bị trên chúng ta sẽ tạo các class User, Role, UserPrinciple giống như trong bài viết này của mình https://blog.codegym.vn/2020/02/20/huong-dan-ve-spring-security-va-jwt-phan-1/
- Sau khi chúng ta tạo đầy đủ các Repository và Service cho 2 class là User và Role theo đường link ở trên chúng ta bắt đầu tiến hành cấu hình:
+) Đầu tiên chúng ta tạo class AuthorizationServerConfig. Class này thì sẽ được kế thừa từ AuthorizationServerConfigurerAdapter và nó sẽ là class tạo ra những đoạn token riêng cho bên phía client:
import org.springframework.beans.factory.annotation.Autowired;

import org.springframework.context.annotation.Configuration;

import org.springframework.security.authentication.AuthenticationManager;

import org.springframework.security.oauth2.config.annotation.configurers.ClientDetailsServiceConfigurer;

import org.springframework.security.oauth2.config.annotation.web.configuration.AuthorizationServerConfigurerAdapter;

import org.springframework.security.oauth2.config.annotation.web.configuration.EnableAuthorizationServer;

import org.springframework.security.oauth2.config.annotation.web.configurers.AuthorizationServerEndpointsConfigurer;

import org.springframework.security.oauth2.provider.token.TokenStore;


@Configuration

@EnableAuthorizationServer

public class AuthorizationServerConfig extends AuthorizationServerConfigurerAdapter {


    static final String CLIENT_ID = "client";

    static final String CLIENT_SECRET = "$2a$04$e/c1/RfsWuThaWFCrcCuJeoyvwCV0URN/6Pn9ZFlrtIWaU/vj/BfG";

    static final String GRANT_TYPE = "password";

    static final String AUTHORIZATION_CODE = "authorization_code";

    static final String REFRESH_TOKEN = "refresh_token";

    static final String IMPLICIT = "implicit";

    static final String SCOPE_READ = "read";

    static final String SCOPE_WRITE = "write";

    static final String TRUST = "trust";

    static final int ACCESS_TOKEN_VALIDITY_SECONDS = 1*60*60;

    static final int REFRESH_TOKEN_VALIDITY_SECONDS = 6*60*60;


    @Autowired

    private TokenStore tokenStore;


    @Autowired

    private AuthenticationManager authenticationManager;


    @Override

    public void configure(ClientDetailsServiceConfigurer configurer) throws Exception {


        configurer

                .inMemory()

                .withClient(CLIENT_ID)

                .secret(CLIENT_SECRET)

                .authorizedGrantTypes(GRANT_TYPE, AUTHORIZATION_CODE, REFRESH_TOKEN, IMPLICIT )

                .scopes(SCOPE_READ, SCOPE_WRITE, TRUST)

                .accessTokenValiditySeconds(ACCESS_TOKEN_VALIDITY_SECONDS).

                refreshTokenValiditySeconds(REFRESH_TOKEN_VALIDITY_SECONDS);

    }


    @Override

    public void configure(AuthorizationServerEndpointsConfigurer endpoints) throws Exception {

        endpoints.tokenStore(tokenStore)

                .authenticationManager(authenticationManager);

    }

}
Vì ở đây mình dùng phiên bản Spring Boot 2.24 nên CLIENT_SECRET cần phải được mã hóa mới có thể chạy được còn đối với những bạn dùng phiên bản Spring Boot < 2 thì có thể viết dạng chuỗi bình thường
+) Sau đó chúng ta tạo file ResourceServerConfig class này sẽ extend từ ResourceServerConfigurerAdapter. Class này sẽ giúp bảo mật các nguồn tài nguyên của ta – REST API. Để truy cập được thì người dùng cần phải được xác thực mới có thể truy cập được những API này.
import org.springframework.context.annotation.Configuration;

import org.springframework.security.config.annotation.web.builders.HttpSecurity;

import org.springframework.security.oauth2.config.annotation.web.configuration.EnableResourceServer;

import org.springframework.security.oauth2.config.annotation.web.configuration.ResourceServerConfigurerAdapter;

import org.springframework.security.oauth2.config.annotation.web.configurers.ResourceServerSecurityConfigurer;

import org.springframework.security.oauth2.provider.error.OAuth2AccessDeniedHandler;


@Configuration

@EnableResourceServer

public class ResourceServerConfig extends ResourceServerConfigurerAdapter {


    private static final String RESOURCE_ID = "resource_id";


    @Override

    public void configure(ResourceServerSecurityConfigurer resources) {

        resources.resourceId(RESOURCE_ID).stateless(false);

    }


    @Override

    public void configure(HttpSecurity http) throws Exception {

        http.anonymous().disable()

                .authorizeRequests()

                .antMatchers("/users/**").authenticated()

                .and().exceptionHandling().accessDeniedHandler(new OAuth2AccessDeniedHandler());

    }


}
+) SecurityConfig
import org.springframework.context.annotation.Bean;

import org.springframework.context.annotation.Configuration;

import org.springframework.security.authentication.AuthenticationManager;

import org.springframework.security.config.annotation.method.configuration.EnableGlobalMethodSecurity;

import org.springframework.security.config.annotation.web.builders.HttpSecurity;

import org.springframework.security.config.annotation.web.configuration.EnableWebSecurity;

import org.springframework.security.config.annotation.web.configuration.WebSecurityConfigurerAdapter;

import org.springframework.security.config.http.SessionCreationPolicy;

import org.springframework.security.crypto.bcrypt.BCryptPasswordEncoder;

import org.springframework.security.crypto.password.PasswordEncoder;

import org.springframework.security.oauth2.provider.token.TokenStore;

import org.springframework.security.oauth2.provider.token.store.InMemoryTokenStore;

import org.springframework.security.web.util.matcher.AntPathRequestMatcher;


@Configuration

@EnableWebSecurity

@EnableGlobalMethodSecurity(prePostEnabled = true)

public class SecurityConfig extends WebSecurityConfigurerAdapter {

    @Override

    @Bean

    public AuthenticationManager authenticationManagerBean() throws Exception {

        return super.authenticationManagerBean();

    }


    @Bean

    public TokenStore tokenStore() {

        return new InMemoryTokenStore();

    }


    @Bean

    public PasswordEncoder passwordEncoder(){

        return new BCryptPasswordEncoder();

    }


    @Override

    protected void configure(HttpSecurity http) throws Exception {

        http.csrf().ignoringAntMatchers("/**");

        http.authorizeRequests()

                .anyRequest().authenticated()

                .and().csrf().disable()

                .logout().logoutRequestMatcher(new AntPathRequestMatcher("/logout"));

        http.sessionManagement()

                .sessionCreationPolicy(SessionCreationPolicy.STATELESS);

        http.cors();

    }

}
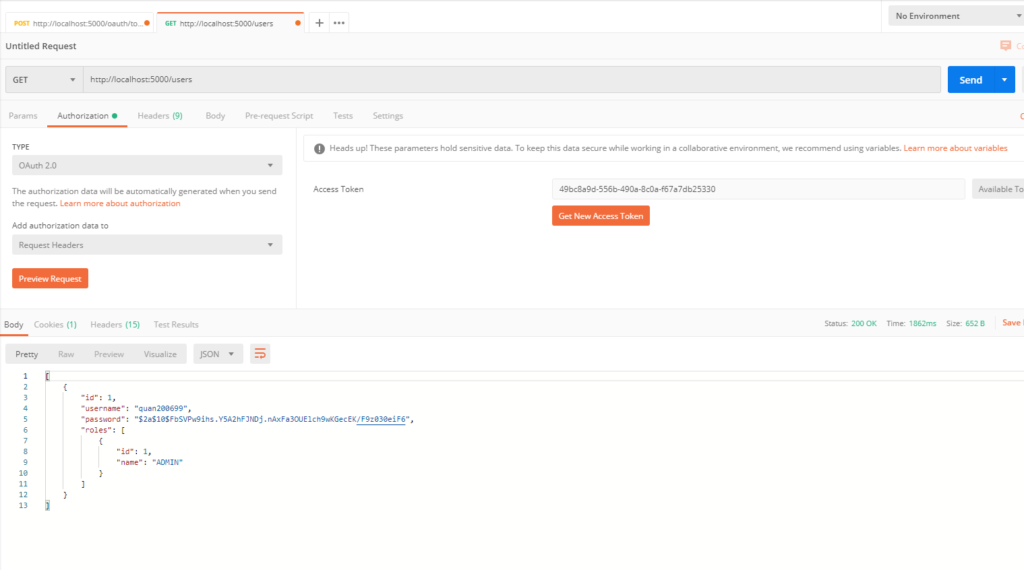
- Sau khi làm xong các bước trên bạn hãy chạy ứng dụng và vào postman để test như sau:
+) Đâu tiên ta sẽ vào thử trang web http://localhost:5000/users cần phải có được xác thực mới có thể truy cập
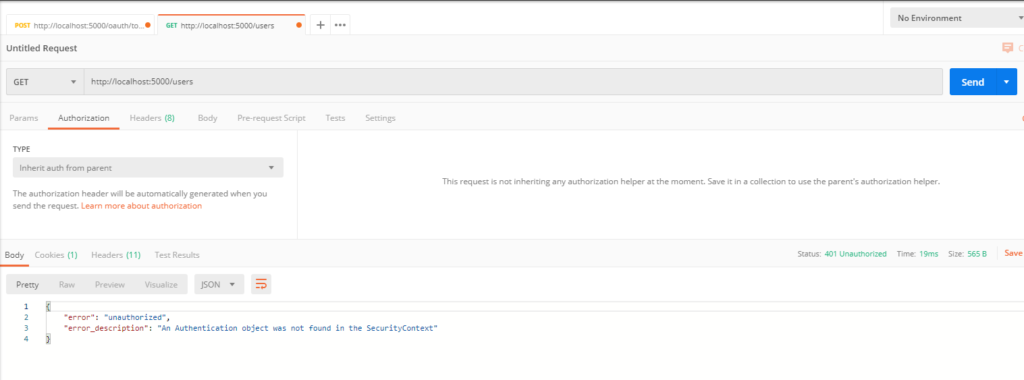
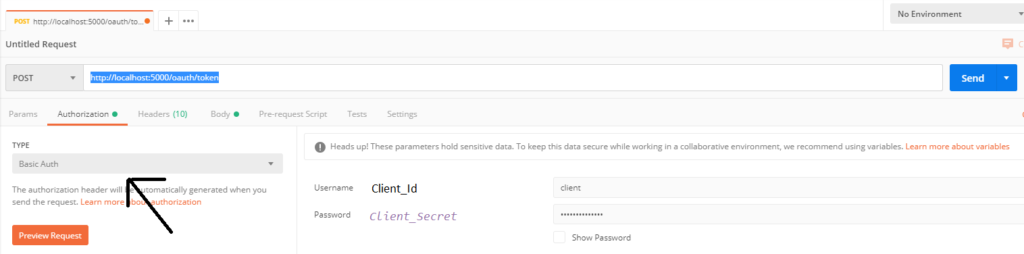
+) Và như trong hình hệ thống báo về lỗi unauthorized cho ta vì thế để giải quyết vấn đề đó chúng ta truy cập đến đường dẫn http://localhost:5000/oauth/token (vì ở đây mình dùng cổng 5000 nên sẽ truy cập đến localhost5000) để tạo ra access token và chọn type là basic auth
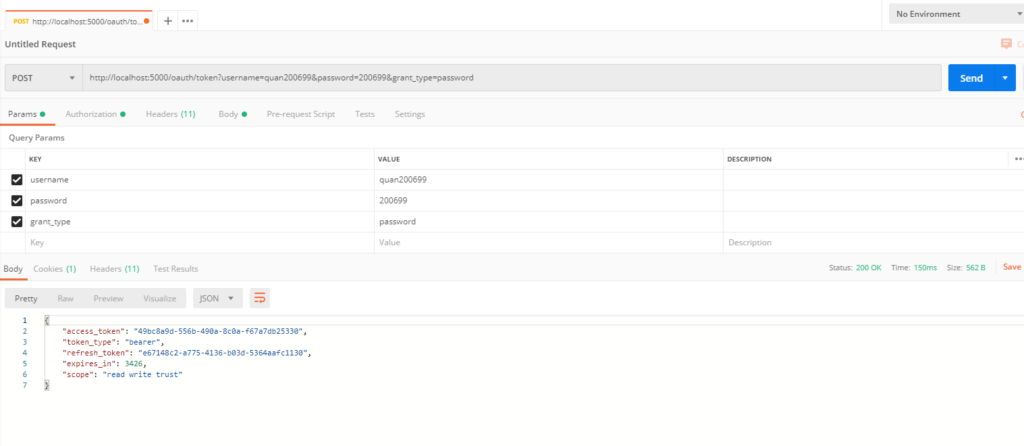
+) Sau đó chúng ta tạo 1 request mới đến đường dẫn http://localhost:5000/users và ở authorization chọn type là OAuth2.0 và dán đoạn access – token vừa nhận được vào ô trống như trong hình và ta sẽ truy cập được vào trang web đó